How to Create a 3D Gold Effect Text Using Photoshop Layers?
Since the most recent decade, Photoshop has gotten perhaps the most famous picture altering devices among architects, photographic artists, and advertisers. It offers a plenty of altering apparatuses which makes it simpler to plan various varieties of pictures in no time.
Photoshop layers are one of those apparatuses being utilized by the majority of the originators. A portion of the generally utilized layers are glass, chrome, and gold. In this article, we are going to share a bit by bit direct on how you can make glossy gold content in Photoshop.
In this way, How about we begin:
Stage 1: Make Another Photoshop Layer
- Tap the Record button situated at the top menubar.
- From that point, you’ve to tap on the New choice.
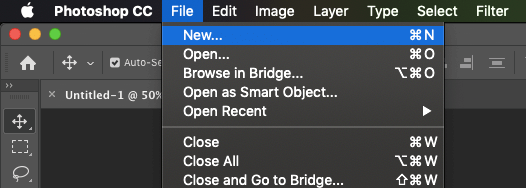
- In the goal box, set the width to 1600 px and stature to 800 px.
- Tap on the Make button.
- This will make another layer.
Stage 2. Set Dark Tone as Foundation Tone
- Tap on the Alter button situated at the top menu bar.
- From that point, select fill choice,
- In the following discourse box, set the Substance to Dark.
- Press alright and it’s finished.
Stage 3: Add Text to the Archive
- Select the Sort Instrument from the toolbar area.
- Type anyplace inside the archive
- Type Gold.
- Set the Text dimension to 72, Textual style Type to Times Now Roman Striking and Textual style Tone to White.
- Likewise, set the R, G, B esteems to 255 while choosing the white tone.
- Tap on the Checkmark symbol in the alternatives bar to apply the changes.
Stage 4: Resize and Move the Content to Focus of the Archive
- Tap on the Alter tab situated at the top menu bar.
- Select the Free Change device from that point.
- Resize the content by hauling the edges of the content.
- Tap inside the content and move it to the focal point of the record.
Stage 5. Make a Copy Layer and Shading it with Slope Overlay
- Go to the Layers board.
- Snap and drag the sort Layer to the New layer symbol situated at the base.
- This will make a copy layer.
- To utilize the Slope impact, tap on the Fx symbol situated at the base.
- Prior to doing as such, ensure the copy layer is chosen.
- In the layers impact menu, select the Slope choice.
- Presently, tap on the Slope shading selector.
- Double tap on the shading stop situated at the left half of the shading selector.
- Presently, set the R to 247, G to 238 and B to 173 worth.
- Return to the Angle shading selector.
- This time, click the shading stop situated on the correct side.
- In the shading picker menu, set the R to 193, G to 172 and B to 81.
- Tap alright and save this shading mix as you will require it later as well.
- This will show up in the Preset area.
Stage 6. Make Some Extra Layer Changes
- Return to the Layer style menu.
- From that point, set the Angle Style to Reflected.
- On the left half of the layer menu, you’ll see layer impacts.
- Select Slant and Decorate alternative.
- This will open another exchange box.
- In the new discourse box, set the Procedure to Etch Hard.
- Under the Concealing menu, you’ll see a Gleam Form alternative.
- Tap on the bolt close to this choice.
- Double tap on the third thumbnail from the left-base column.
- Change the point to 120 degrees and empower the Counter Associated alternative.
- Presently, set both the haziness and shadow darkness to 75{1a8e1ba895c8c7106f87da981d83b14a45415abb73e58ede95c2b78de70ffddc}.
- Increment the size of the Angle and Embellish to 41 pixels.
- Then, set the profundity worth to 170{1a8e1ba895c8c7106f87da981d83b14a45415abb73e58ede95c2b78de70ffddc}.
- Tap on the Internal Gleam impact to add it.
- This will open another exchange box.
- In the new exchange box, set the mix mode to duplicate.
- Set the mistiness level to 50{1a8e1ba895c8c7106f87da981d83b14a45415abb73e58ede95c2b78de70ffddc}.
- Presently, tap on the shading trade and set the R-worth to 232, G to 128, B to 31 and squeeze alright.
- Set the Size to 75 pixels.
- Tap alright to apply the changes.
Stage 7. Select the First Layer and Add Stroke to it
- Return to the layers board.
- Tap on the first archive to choose it.
- Presently, tap on the Fx symbol situated at the base.
- This time, you’ve to pick the stroke choice.
- Change the Fill Type to Slope.
- Snap the bolt close to the Angle alternative.
- Presently, select the Angle impact that we have made before.
- Set the Angle Style to Mirrored, its size to 8 px and Position to Outside.
- Tap alright to apply the changes.
Stage 8. Apply Slope and Decorate to the Stroke
- Indeed, tap on the Slant and Emblazon choice.
- Simply change the Style to Stroke Emblazon.
- Set the Size worth to 8 Px and don’t roll out any further improvements.
- Tap alright to apply the changes.
Stage 9. Turn on the Shape Impact
- Under the Angle and Embellish, you’ll discover the Form choice.
- Tap on it to choose it.
- This will improve the lighting impact around the content.
Stage 10. Apply External Sparkle Impact to the Content
- Under the styles segment, you’ll see the External Shine impact.
- Snap on it to choose the choice.
- This will open another discourse box.
- Set the haziness to 40{1a8e1ba895c8c7106f87da981d83b14a45415abb73e58ede95c2b78de70ffddc}
- Snap on the Shading Pattern.
- Set the R-worth to 232, G to 128 and B to 31.
- Set the Size to 60 px.
- Tap alright to apply the changes.
Stage 11. Add Shines to the Content
- Return to the layer board.
- Select the copy layer.
- Press and hold the Alt key and tap on the Add New Layer symbol.
- Name this layer as Shines.
- The new layer will show in the layer board.
- Snap on the Shines layer.
- Presently, select the Brush apparatus from the toolbar.
- Right-click inside the record to open Brush Preset picker.
- Tap on the Stuff symbol situated at the upper left.
- Select Inheritance brushes.
- Tap alright to reestablish Inheritance brushes.
- Presently, you’ve to choose Inheritance brushes from the Brush Preset Picker menu.
- Under it, select the Various brushes alternative.
- Explore to the Crosshatch 4 brush and double tap on it.
- Select the Eyedropper apparatus
- Press and hold Alt and tap on the Gold shading region to catch an example tone.
- Switch back to the brush instrument.
- Tap anyplace on the content to add shimmers to it.
- That is it! You’ve effectively made a Gold content in Photoshop.

How to Use the Smart Sharpen Tool in Photoshop?

Top 5 Best Techniques to Find Potential Keywords for an Ecommerce Platform

Top 5 Online Business Ideas with Less Startup Cost
About The Author
TurkDebrid
John Brown is a qualified personal trainer with a sports medicine degree from Fremont College, as well as professional certifications from the American College of Sports Medicine and the National Strength and Conditioning Association.